
Shopify has fundamentally changed how tracking works in and around its checkout. The era of pasting scripts into checkout.liquid or the “additional scripts” box is over: Shopify Plus stores lost those scripts on the Thank you and Order status pages in August 2025, and every other Shopify store followed on 26 August 2026. Anything still pasted there simply stopped firing, silently.
The supported route today is a custom pixel built on Shopify’s Customer Events system. This guide shows you how to run Google Tag Manager on Shopify through a custom pixel, including a complete, ready-to-use script that pushes GA4-style ecommerce events into your data layer. It is written for store owners and marketers who manage their own Shopify GTM setup.
What changed in Shopify tracking
Shopify replaced its old, script-friendly checkout with checkout extensibility: a locked-down checkout where you cannot inject your own JavaScript. Tracking moved to a dedicated system called pixels, managed under Settings, then Customer events, in your Shopify admin.
The timeline matters if your data recently broke. Shopify Plus stores lost additional scripts and checkout.liquid on the Thank you and Order status pages on 28 August 2025. All other stores lost additional scripts and script tags on those pages on 26 August 2026. There was no error message: legacy scripts just stopped running.
So if your Shopify conversion numbers dropped off a cliff in late August 2026 and you never migrated, this is almost certainly why. The fix is the setup below.
How the custom pixel route works
A custom pixel is a snippet of JavaScript that Shopify runs in a sandboxed environment, separate from your storefront pages. Inside that sandbox you subscribe to Shopify’s standard events through the Web Pixels API: page views, product views, add to cart, checkout started, checkout completed and more.
The pattern for GTM users is simple. The pixel loads GTM inside the sandbox, listens to Shopify’s events with analytics.subscribe(), translates each one into a GA4-style data layer push, and your GTM tags take it from there.
The sandbox has consequences you should know about. The pixel cannot see or touch the page itself, so tags that need direct DOM access will not work from here. And because the sandbox is isolated, testing works differently than you are used to; more on that in step 5.
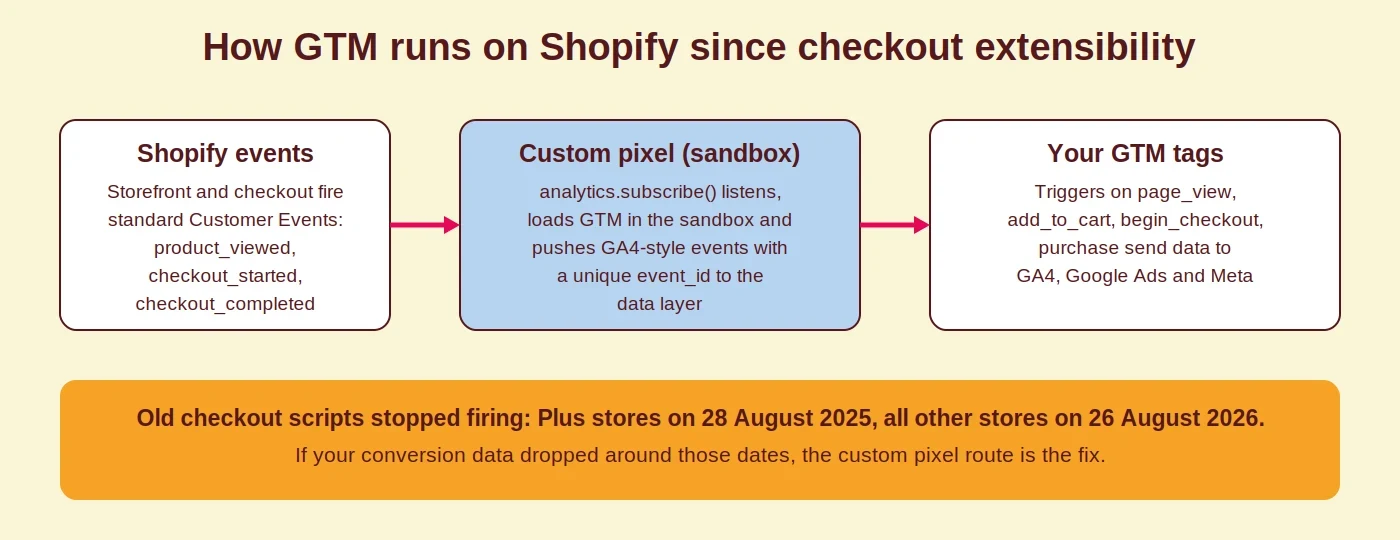
Set up GTM as a custom pixel in six steps
Step 1: Audit what you have now
List which events you currently track and where the code lives: GTM in theme.liquid, scripts in the theme, old additional scripts, or apps that inject their own pixels. This inventory decides what you migrate and what you switch off, and it prevents the classic outcome of two setups measuring the same purchase.
Step 2: Prepare your GTM container
Confirm you have publish access, export a backup of the current container, and keep your container ID (format GTM-XXXXXXX) at hand.
Step 3: Add the custom pixel in Shopify
- In Shopify admin, go to Settings, then Customer events.
- Click Add custom pixel and name it, for example, Google Tag Manager.
- Review the Customer privacy settings for the pixel. These decide whether the pixel waits for consent before it runs.
- Paste the script from the next section, replace the container ID, then Save and Connect.
One honest note on those privacy settings. Setting the pixel to require no permission makes it fire for every visitor, consent or not. If you sell to visitors in the EEA or UK and run a consent banner, that shortcut undermines your consent setup. Match the pixel’s permission settings to your actual consent strategy rather than defaulting to the most permissive option.
The GTM custom pixel script
Replace GTM-YOUR_ID with your own container ID. The script loads GTM, subscribes to Shopify’s standard events and pushes them to the data layer in GA4 ecommerce format, including a unique event_id per event that you can reuse for deduplication.
  (function () {
  // --- 0) Utilities ---
  function uuid() {
    return 'xxxxxxxx-xxxx-4xxx-yxxx-xxxxxxxxxxxx'.replace(/[xy]/g, function (c) {
      const r = Math.random() * 16 | 0, v = c === 'x' ? r : (r & 0x3 | 0x8);
      return v.toString(16);
    });
  }

  // --- 1) Load GTM ---
  (function (w, d, s, l, i) {
    w[l] = w[l] || [];
    w[l].push({ 'gtm.start': new Date().getTime(), event: 'gtm.js' });
    var f = d.getElementsByTagName(s)[0],
        j = d.createElement(s),
        dl = l != 'dataLayer' ? '&l=' + l : '';
    j.async = true;
    j.src = 'https://www.googletagmanager.com/gtm.js?id=' + i + dl;
    f.parentNode.insertBefore(j, f);
  })(window, document, 'script', 'dataLayer', 'GTM-YOUR_ID');

  // Ensure dataLayer exists
  window.dataLayer = window.dataLayer || [];

  // --- 2) Normalizers (GA4 item format) ---
  function fromVariant(variant, qty) {
    if (!variant) return null;
    const p = variant.product || {};
    const priceAmount = (variant.price && (variant.price.amount ?? variant.price)) || 0;
    const currency = (variant.price && variant.price.currencyCode) || undefined;

    return {
      item_id: variant.sku || variant.id || p.id || 'unknown',
      item_name: p.title || 'unknown',
      item_brand: p.vendor || undefined,
      item_category: p.type || undefined,
      item_variant: variant.title || undefined,
      price: Number(priceAmount),
      quantity: Number(qty || 1),
      currency: currency
    };
  }

  function fromCartLine(line) {
    const v = line?.merchandise;
    return fromVariant(v, line?.quantity || 1);
  }

  function fromCheckoutLine(line) {
    const v = line?.variant;
    const base = fromVariant(v, line?.quantity || 1);
    if (!base) return null;
    const amount = line?.finalLinePrice?.amount ?? v?.price?.amount ?? 0;
    const code = line?.finalLinePrice?.currencyCode ?? v?.price?.currencyCode;
    base.price = Number(amount);
    base.currency = code;
    return base;
  }

  // --- 3) Subscriptions (GA4-style events) ---

  // page_view
  analytics.subscribe('page_viewed', function (e) {
    const shop = e?.data?.shop || {};
    window.dataLayer.push({
      event: 'page_view',
      event_id: uuid(),
      currency: shop.currency
    });
  });

  // view_item
  analytics.subscribe('product_viewed', function (e) {
    const v = e?.data?.productVariant;
    const item = fromVariant(v, 1);
    if (item) {
      window.dataLayer.push({
        event: 'view_item',
        event_id: uuid(),
        ecommerce: {
          currency: item.currency,
          items: [item]
        }
      });
    }
  });

  // add_to_cart
  analytics.subscribe('product_added_to_cart', function (e) {
    const line = e?.data?.cartLine;
    const item = fromCartLine(line);
    if (item) {
      window.dataLayer.push({
        event: 'add_to_cart',
        event_id: uuid(),
        ecommerce: {
          currency: item.currency,
          items: [item]
        }
      });
    }
  });

  // remove_from_cart
  analytics.subscribe('product_removed_from_cart', function (e) {
    const line = e?.data?.cartLine;
    const item = fromCartLine(line);
    if (item) {
      window.dataLayer.push({
        event: 'remove_from_cart',
        event_id: uuid(),
        ecommerce: {
          currency: item.currency,
          items: [item]
        }
      });
    }
  });

  // view_cart
  analytics.subscribe('cart_viewed', function (e) {
    const lines = e?.data?.cart?.lines || [];
    const items = lines.map(fromCartLine).filter(Boolean);
    if (items.length) {
      const currency = items.find(i => i.currency)?.currency;
      window.dataLayer.push({
        event: 'view_cart',
        event_id: uuid(),
        ecommerce: {
          currency: currency,
          items: items
        }
      });
    }
  });

  // begin_checkout
  analytics.subscribe('checkout_started', function (e) {
    const co = e?.data?.checkout;
    const lines = co?.lineItems || [];
    const items = lines.map(fromCheckoutLine).filter(Boolean);
    window.dataLayer.push({
      event: 'begin_checkout',
      event_id: uuid(),
      ecommerce: {
        value: Number(co?.totalPrice?.amount || 0),
        currency: co?.currencyCode,
        items
      }
    });
  });

  // purchase (raw GID transaction_id)
  analytics.subscribe('checkout_completed', function (e) {
    const co = e?.data?.checkout || {};
    const lines = co?.lineItems || [];
    const items = lines.map(fromCheckoutLine).filter(Boolean);

    const rawId = co?.order?.id || 'unknown'; // keep full Shopify GID

    window.dataLayer.push({
      event: 'purchase',
      event_id: uuid(),
      ecommerce: {
        transaction_id: rawId,   // raw GID preserved
        value: Number(co?.totalPrice?.amount || 0),
        currency: co?.currencyCode,
        items
      }
    });
  });

  // view_item_list (collections)
  analytics.subscribe('collection_viewed', function (e) {
    const col = e?.data?.collection;
    const variants = col?.productVariants || [];
    const items = variants.map(v => fromVariant(v, 1)).filter(Boolean);
    if (items.length) {
      window.dataLayer.push({
        event: 'view_item_list',
        event_id: uuid(),
        ecommerce: {
          item_list_id: col?.id,
          item_list_name: col?.title,
          items
        }
      });
    }
  });

  // search + view_search_results
  analytics.subscribe('search_submitted', function (e) {
    const sr = e?.data?.searchResult;
    const q = sr?.query;
    window.dataLayer.push({
      event: 'search',
      event_id: uuid(),
      search_term: q
    });

    const variants = sr?.productVariants || [];
    const items = variants.map(v => fromVariant(v, 1)).filter(Boolean);
    if (items.length) {
      const currency = items.find(i => i.currency)?.currency;
      window.dataLayer.push({
        event: 'view_search_results',
        event_id: uuid(),
        ecommerce: {
          currency: currency,
          items
        }
      });
    }
  });

})();
Step 4: Map the events to your tags in GTM
In GTM, create custom event triggers for page_view, view_item, add_to_cart, begin_checkout, purchase and the other events the script pushes. Attach those triggers to your GA4 event tags, Google Ads conversion tags and Meta pixel tags, reading values and items from the data layer.
Step 5: Test it properly
Because the pixel runs in a sandbox, GTM’s Preview mode often will not connect to it the way it does on a normal page. Test with Shopify’s own pixel testing tools, the GA4 DebugView and real-time reports, and a test order if you can. Check that the purchase event arrives once, with the right value, currency and items.
Step 6: Publish and monitor
Publish the GTM container, then watch your platforms for a few days. Compare Shopify’s own order count with the purchases in GA4 and your ad platforms. The numbers will never match to the decimal, but they should be close and stable.
Common mistakes we see
1. Running two tracking setups at once. GTM in your theme and GTM in a custom pixel can both fire events for the same session. Decide which route owns which event. A common split: the theme handles storefront behaviour, the pixel owns checkout and purchase.
2. Treating the checkout events as optional. The events that matter most for your ads, begin_checkout and purchase, are exactly the ones the old scripts can no longer send. If you migrated the storefront but not the checkout events, your funnel data stops where the money starts.
3. The most permissive privacy setting. A pixel that ignores consent looks great in the numbers until you consider what it does to compliance. Set permissions consciously.
4. Mismatched transaction IDs. The script preserves Shopify’s full order GID as transaction_id. Whatever ID format you choose, use it consistently across GA4, Google Ads and any server-side setup, or deduplication breaks and orders count twice.
Ready for the next step? Go server-side
The custom pixel fixes the client side, but browser tracking still loses signal to ad blockers, Safari’s tracking prevention and consent choices. The natural next step is routing these same data layer events through a server container. Our guides to server-side tagging, the tool options and the GTM and TAGGRS setup cover that route in detail, and the Meta Conversions API pairs naturally with the event_id this script already generates.
How Coby approaches this
At Coby, Shopify tracking migrations are standard work inside our data and analytics service, usually completed within a day. We work tracking first: the measurement layer gets fixed before anyone touches campaign settings, because campaigns optimised on broken purchase data optimise the wrong thing.
That order pays off. For one B2B client, repairing the measurement foundation before scaling campaigns helped take them from two to three leads per month to four to five per week. On a Shopify store, the same principle applies to every purchase event your ads learn from.
Conclusion
Shopify’s checkout no longer runs your old scripts, and since 26 August 2026 that applies to every store, not just Plus. The custom pixel route above restores full-funnel tracking: GTM in a sandbox, Shopify’s standard events translated to a GA4-style data layer, and your tags mapped on top. Set the privacy permissions deliberately, test the purchase event properly, and switch off whatever the pixel replaced.
Rather have it done for you, including the server-side layer? Get in touch and we will sort your migration out.
Frequently asked questions
Do I still need a custom pixel if GTM is already in my theme?
Yes, for checkout. GTM in theme.liquid keeps working on storefront pages, but checkout and the Thank you page only expose events through Customer Events, so purchase tracking needs the pixel route.
What happened to additional scripts on the Thank you page?
Shopify turned them off as part of checkout extensibility: on 28 August 2025 for Plus stores and on 26 August 2026 for all other stores. Legacy scripts stopped firing without any warning or error.
Which events can the custom pixel capture?
Shopify’s standard events include page views, product and collection views, search, cart actions, checkout started and checkout completed. The script in this guide maps the most important ones to GA4-style data layer events.
Why does GTM Preview mode not connect to my pixel?
Custom pixels run in a sandboxed environment, which Preview mode often cannot attach to. Test with Shopify’s pixel testing tools, GA4 DebugView and real-time reports instead.
Can I send Meta events through this setup?
Yes. Trigger your Meta pixel tags in GTM from the same data layer events, and reuse the script’s event_id for deduplication if you add the Conversions API later.
Do I need Shopify Plus for custom pixels?
No. Custom pixels are available on all Shopify plans under Settings, then Customer events. Plus mainly adds deeper checkout UI customisation, not the pixel system itself.
Written by Marloes Slotboom, founder of Coby Agency. Last updated: September 2026.